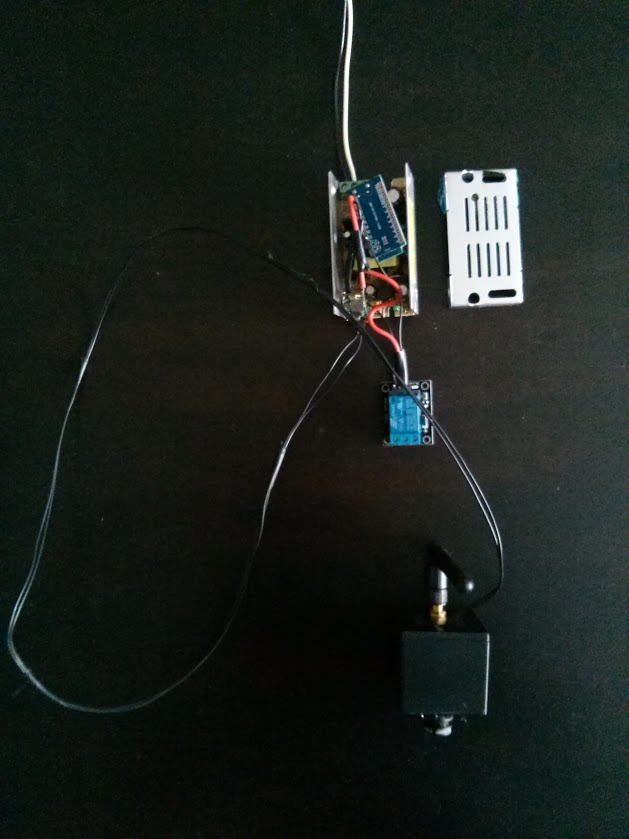
 Open the metal case, pack it in. AC comes in the top. DC goes out the bottom to the Relay, microcontroller and my IP camera.[/caption]
Parts list:
Total: $15.55 ($7.28 if you go with the mini NodeMCU)
WARNING!!! this switch can switch up to 110/240V AC @ 10A. This is more than enough to cook your insides or “stop” your heart and kill you. Do not play with your house mains unless you know what you’re doing and you understand the risks. One mistake and you’re dead. If you’re not sure, close this page. It’s not worth it.
I made this WiFi switch to add an IP camera to the outside of my house, without having to run new power lines to it. The idea was to tap into the 110V AC of an existing outdoor porch light to power my camera. I would then keep the switch to the light ON all the time, to power my camera ON all the time. But I didn’t want my porch light to be on all the time. So, a WiFi smart switch will replace the wall switch to control the light. This was acceptable, since we don’t turn the porch light on/off frequently, and it’s better off scheduled (turn on at night) or automated (turn on when motion detected).
My only constraint was that everything had to fit into an in-wall power conduit or switch box. The largest part was the AC/DC transformer/power supply. I managed to find a 1.25A power supply that is 70 x 39 x 31 mm. As a bonus, you can open its metal case and pack your microcontroller and other electronics inside it:
[caption id=”attachment_457” align=”alignnone” width=”629”] Open the metal case, pack it in. AC comes in the top. DC goes out the bottom to the Relay, microcontroller and my IP camera.[/caption]
The input of the power supply is 110/240VAC and the output is 12V DC. My IP Camera uses 12V DC, so it took the raw 12V DC. But the Cactus Micro and the Relay need lower voltage. So I used the DC-DC converter to step down 12V DC to 5V DC.
[caption id=”attachment_455” align=”alignnone” width=”629”]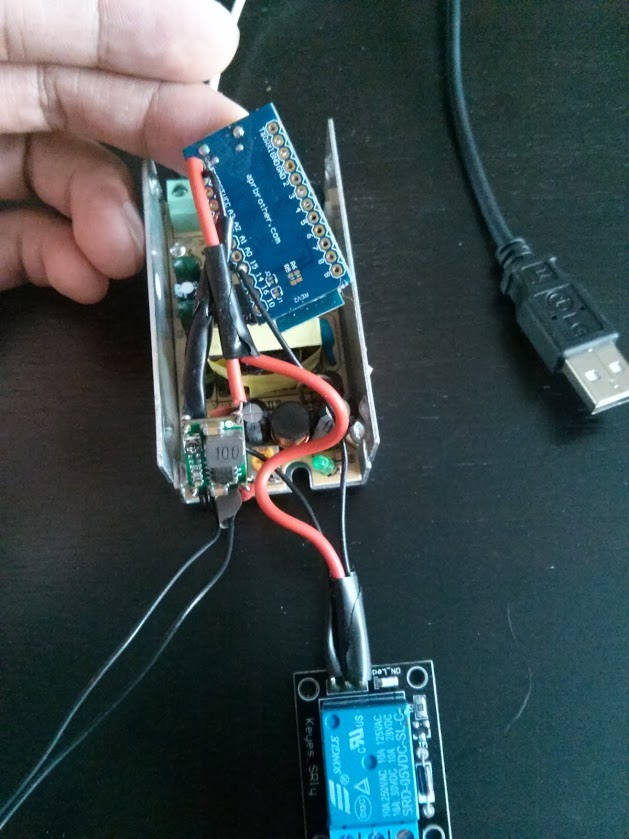 Closer look at the DC bits. The blue board I’m lifting up is the microcontroller that talks over WiFi and switches the relay. USB for scale.[/caption]
[caption id=”attachment_456” align=”alignnone” width=”629”]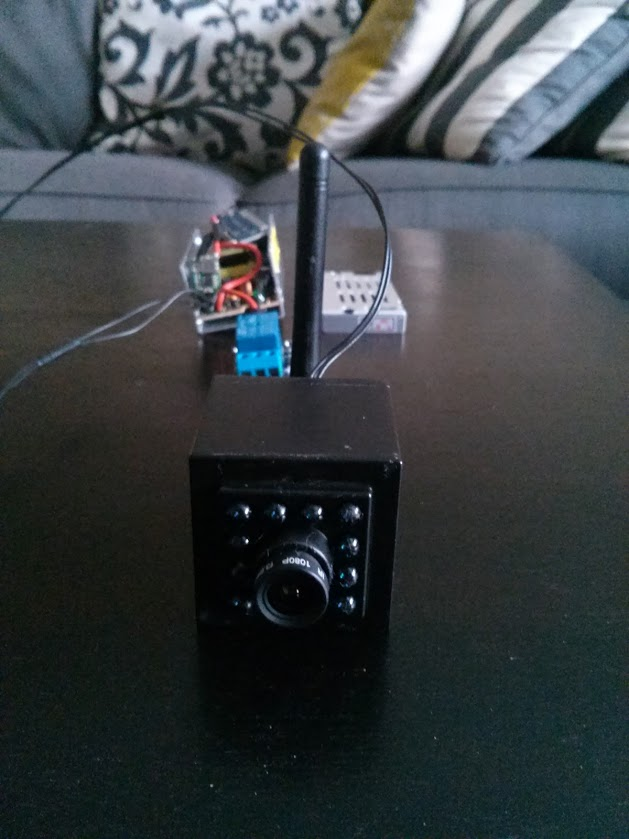 Closer look at my camera[/caption]
[caption id=”attachment_454” align=”alignnone” width=”1000”]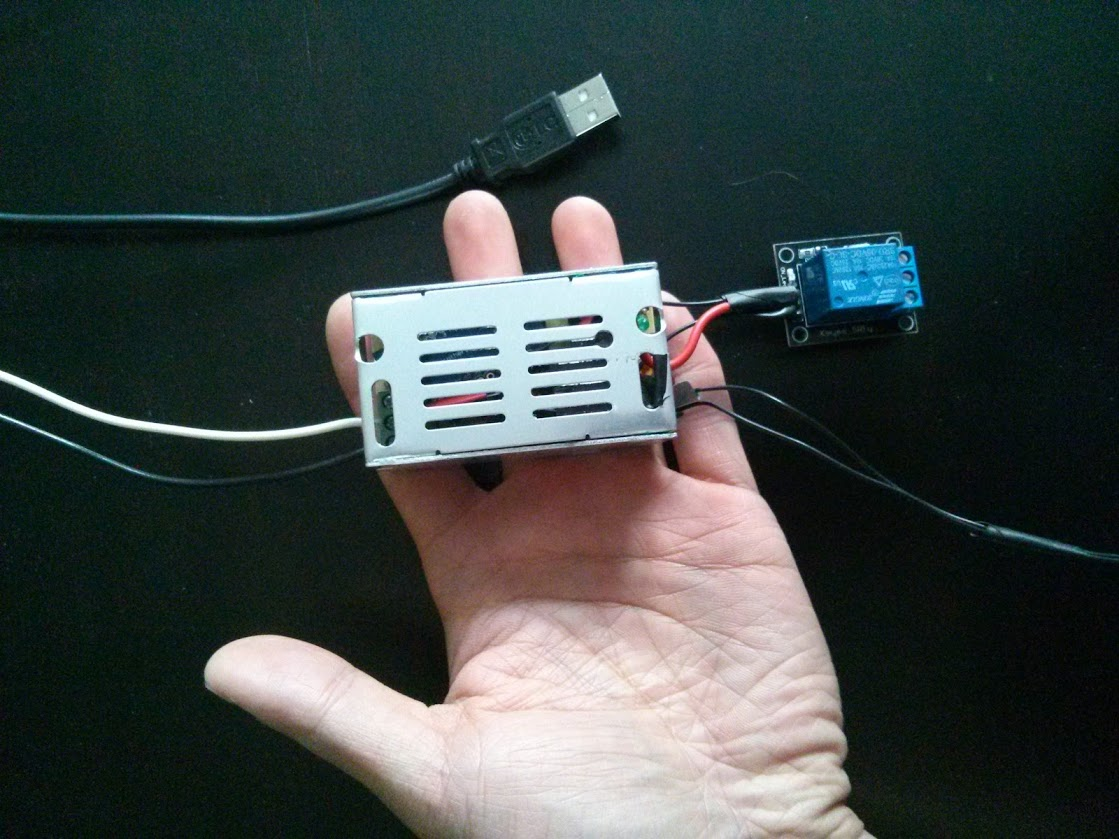 Closed up. Compact enough to fit into a wall conduit/switch box.[/caption]
And that’s the WiFi switch. Wire the switch up like this:
[caption id=”attachment_476” align=”alignnone” width=”664”]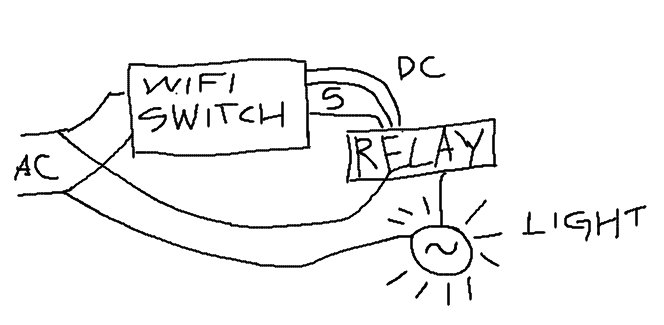 Your WiFi switch can now control your light or whatever AC load you want up to 240V 10A[/caption]
The rest of the magic happens in software. There are 2 parts to the software. 1 part is the code you upload to the Arduino microcontroller. That connects to WiFi, listens for on/off commands and switches the relay. The 2nd part is what sends on/off commands to your smart switch.
Software Part 1: Let’s set up your MQTT broker first. MQTT is the protocol that we’ll use to send commands to your Smart Switch and switch it on/off almost instantly. You can think of MQTT as an “IoT Twitter”. It lets your switch “subscribe” to a topic. Then something else can “publish” to that topic to turn it on/off. You need a MQTT broker because that’s what passes your messages between publisher and sender.
The easiest way to get a MQTT broker is to sign up for CloudMQTT’s free “Cute Cat” plan: https://www.cloudmqtt.com/plans.html. The 4 pieces of info you need after you set it up are: - Your broker’s hostname or IP address - Your broker’s port - Your broker’s user - Your broker’s password
Software Part 2: Arduino code. I used a Cactus Micro, which has 2 chips in one package: an Arduino chip and an ESP8266 for WiFi. 1st step is to program the ESP8266 with Espduino. Espduino is an Arduino library that makes it easy to connect to WiFi and talk MQTT.
IMPORTANT: Use Arduino IDE version 1.0.6. If you use version 1.0.5 your Cactus Micro will be unstable and randomly crash.
Disclaimer: The code below has a little more than the MQTT on/off stuff. I wanted to also show you how to sync time and also upload data to thingspeak.com. If you don’t need those, just delete them. I included them because I’ve found them useful in all my projects and they show you how you can upload/download regular HTTP via Espduino. I also included some bulletproofing code that reboots the ESP8266 if it malfunctions.
Replace all the “TODO_…” strings with your own info
#include
#include
#include
#include

#define MY_NAME "MY_SMARTSWITCH"
#define TS_KEY "TODO_THINGSPEAK_KEY"
#define MQTT_SERVER "TODO_MQTT_HOSTNAME_OR_IP"
#define MQTT_PORT TODO_MQTT_PORT
#define MQTT_USER "TODO_MQTT_USER"
#define MQTT_PASS "TODO_MQTT_PASS"
#define MQTT_ROOT_TOPIC "/homebot/switches"
#define ESP_PIN 13
#define RELAY_PIN 15
#define SSID "TODO_WIFI_SSID"
#define WIFIPW "TODO_WIFI_PASSWORD"

/*******************************************************
 * Wifi switch class
 *******************************************************/

#define ESP_REFRESH_THRESH 2
#define MAX_BUFSZ 300
char g_buf[MAX_BUFSZ];
int g_wifiStatus = 0; // 0=disconnected, 1=connecting, 2=OK

int g_switchCommand = 0;
unsigned long g_switchCommandTime = 0;
MQTT *g_mqtt = NULL;

void wifiCb(void* response)
{
  uint32_t status;
  RESPONSE res(response);

  if (res.getArgc() != 1)
    return;

  res.popArgs((uint8_t*)&status, 4);
  if (status != STATION_GOT_IP)
  {
    g_mqtt->disconnect();
    return;
  }

  Serial.println("WIFI CONNECTED");
  g_wifiStatus = 2;

  g_mqtt->connect(MQTT_SERVER, MQTT_PORT);
}

void mqttConnected(void* response)
{
  Serial.println("MQTT connected");
  sprintf(g_buf, "%s/%s/cmd", MQTT_ROOT_TOPIC, MY_NAME);
  g_mqtt->subscribe(g_buf);
}
void mqttDisconnected(void* response) { }
void mqttData(void* response)
{
  if (timeStatus() == timeNotSet)
    return; // because we use now() below

  Serial.println("ARDUINO: recvd MQTT command...");
  RESPONSE res(response);

  String data = res.popString(); // topic
  Serial.println(data);

  data = res.popString(); // data
  Serial.println(data);

  g_switchCommandTime = now();
  if (data == "1")
    g_switchCommand = 1;
  else
    g_switchCommand = 0; // default to 'off'
}
void mqttPublished(void* response) { }

class WifiSwitch {
public:
  WifiSwitch()
  : m_esp(&Serial1, &Serial, ESP_PIN),
    m_mqtt(&m_esp),
    m_lastESPrefresh(0), m_lastClockSync(0), m_lastDataUpload(0),
    m_espWorkerIdx(0), m_needToRefreshESP(0)
  {
    g_mqtt = &m_mqtt; // for callbacks
  }

  void setup() {
    pinMode(RELAY_PIN, OUTPUT);
    digitalWrite(RELAY_PIN, LOW); // disable relay
  }
  void loop() {
    /*******************************************
     * Do offline work
     *******************************************/

    /*******************************************
     * Do offline work that depends on Time
     *******************************************/

    if (timeStatus() != timeNotSet)
    {
      doCommand();
    }

    /*******************************************
     * Do online work
     *******************************************/

    if (refreshESP())
      return;

    m_esp.process();

    if (g_wifiStatus != 2)
      return; // can't do anything without wifi these days...

    if (m_espWorkerIdx == 0)
      syncClock();
    else if (m_espWorkerIdx == 1)
      uploadData();

    m_espWorkerIdx = (m_espWorkerIdx+1) % 2;
  }

  bool refreshESP() {
    if (!ESPneedsRefresh())
      return false;

    m_lastESPrefresh = millis();
    m_needToRefreshESP = 0;

    Serial.println("Reset ESP");
    g_wifiStatus = 1; // connecting

    m_mqtt.disconnect();

    m_esp.disable();
    delay(1000);
    m_esp.enable();
    delay(1000);
    m_esp.reset();
    delay(1000);

    int waitIter = 0;
    while (!m_esp.ready())
    {
      if (waitIter++ > 10)
      {
        // ESP failed to come up
        // -- force hardware refresh
        m_needToRefreshESP = ESP_REFRESH_THRESH;
        return true;
      }
      Serial.println("Waiting for ESP...");
    }

    setupMQTT();

    setupWifi();

    Serial.println("ARDUINO: system online");

    return true;
  }

  bool restGet(char *host, char *path, char *buf, int sz) {
    REST rest(&m_esp);

    if (!rest.begin(host)) {
      m_needToRefreshESP++;
      return false;
    }

    rest.get(path);

    memset(buf, 0, sz);

    if (rest.getResponse(buf, sz) != HTTP_STATUS_OK) {
      m_needToRefreshESP++;
      return false;
    }

    m_needToRefreshESP = 0;
    return true;
  }

  void uploadData() {
    if (!dataNeedsUpload())
      return;

    Serial.println("ARDUINO: upload to thingspeak...");

    m_lastDataUpload = millis();

    unsigned long uptimeMinutes = millis() / 1000 / 60;
    int ret = snprintf(g_buf, MAX_BUFSZ,
      "/update?key=%s&field1=%d&field2=%02d:%02d:%02d&field3=%d&field4=%lu",
      TS_KEY, weekday(), hour(), minute(), second(),
      g_switchCommand, uptimeMinutes
      );
    if (!(ret > 0 && ret < MAX_BUFSZ))
      return;

    //Serial.println(g_buf);

    if (restGet("api.thingspeak.com", g_buf, g_buf, MAX_BUFSZ-1))
    {
      Serial.println("RESPONSE: ");
      Serial.println(g_buf);
    }
  }

  void setupWifi() {
    Serial.println("ARDUINO: setup wifi");
    m_esp.wifiCb.attach(&wifiCb);
    m_esp.wifiConnect(SSID, WIFIPW);
  }

  void setupMQTT() {
    Serial.println("ARDUINO: setup MQTT");
    if (!m_mqtt.begin(MY_NAME, MQTT_USER, MQTT_PASS, 120, 1))
      return; // failed to set up MQTT

    m_mqtt.lwt("/lwt", "offline", 0, 0);

    m_mqtt.connectedCb.attach(&mqttConnected);
    m_mqtt.disconnectedCb.attach(&mqttDisconnected);
    m_mqtt.publishedCb.attach(&mqttPublished);
    m_mqtt.dataCb.attach(&mqttData);
  }

  void syncClock() {
    if (!clockNeedsSync())
      return;

    Serial.println("ARDUINO: sync clock...");

    sprintf(g_buf, "%s", "/pdt/now.json?format=\\H%20\\M%20\\S%20\\d%20\\m%20\\y");
    //Serial.println(g_buf);

    if (!restGet("www.timeapi.org", g_buf, g_buf, MAX_BUFSZ-1))
      return;

    char *dateStr = strchr(g_buf, ':');
    if (dateStr == NULL)
      return;
    dateStr += 2;
    char *end = strchr(dateStr, '"');
    if (end == NULL)
      return;
    *end = '\0';

    Serial.println(dateStr);

    int H, M, S, d, m, y;
    int numRead = sscanf(dateStr, "%d %d %d %d %d %d",
      &H, &M, &S, &d, &m, &y);
    if (numRead != 6)
      return;

    setTime(H, M, S, d, m, y);
    m_lastClockSync = millis();

    Serial.println("ARDUINO: clock synced!");
  }

  void doCommand() {
    unsigned long epochSecs = now();

    if (g_switchCommand == 1)
      digitalWrite(RELAY_PIN, HIGH);
    else
      digitalWrite(RELAY_PIN, LOW);
  }

private:
  boolean clockNeedsSync() {
    if (timeStatus() == timeNotSet)
      return true;

    if (m_lastClockSync == 0)
      return true;

    if (millis() - m_lastClockSync > 900000) // 15 mins
      return true;

    return false;
  }

  boolean dataNeedsUpload() {
    if (m_lastDataUpload == 0)
      return true;

    // thingspeak only lets 1 update through every 15 seconds
    if (millis() - m_lastDataUpload > 16000)
      return true;

    return false;
  }

  boolean ESPneedsRefresh() {
    if (m_lastESPrefresh == 0)
      return true;

    if (millis() - m_lastESPrefresh < 30000) // 1 min
    {
      // don't refresh too often
      return false;
    }

    if (m_needToRefreshESP >= ESP_REFRESH_THRESH)
      return true; // exceeded error thresh for refresh

    if (g_wifiStatus != 2)
      return true; // couldn't connect wifi, reboot+retry

    return false;
  }

  ESP m_esp;
  MQTT m_mqtt;
  unsigned long m_lastDataUpload; // uses millis()
  unsigned long m_lastESPrefresh; // uses millis()
  unsigned long m_lastClockSync; // uses millis()
  int m_espWorkerIdx;
  int m_needToRefreshESP;
};

/*******************************************************
 * "Main"
 *******************************************************/

WifiSwitch mySwitch;

void setup() {
  Serial1.begin(19200); // don't change baud or...
  Serial.begin(19200);  // ... you'll get stuck 'Waiting for ESP'
  delay(10); // safety brick preventer
  mySwitch.setup();
}

void loop() {
  mySwitch.loop();
}
Once you have everything set up, you can power your switch and test it using the CloudMQTT “Websocket UI.” The code above subscribes your switch to the “/homebot/switches/MY_SMARTSWITCH/cmd” topic. Send a “1” over MQTT to turn it on. Send a “0” or whatever else to turn it off.
Here is mine in action: https://www.youtube.com/watch?v=PnbewXYqUOE
Happy switching!
P.S. If you get stuck or have any questions, email me at aaron@secretsciencelab.com
P.P.S Please don’t die by being stupid with electricity. Actually it’s probably best if you don’t try this project.